Created: 10/16/2022
Git: Some Help
This is a tutorial for the following topics:
- shell aliases
- staging hunks (
git add -i) - cherry-picking
- understanding merge commits
- reverting commits
Shell Aliases
Off the top of my head, here are a few aliases I use almost every day, and you can see how much typing they save.
| Alias | Command |
ga |
git add |
gc |
git commit |
gca |
git commit --amend |
gcan! |
git commit --amend --no-edit |
gpsup |
git push --set-upstream $CURRENT_BRANCH |
gl |
git pull |
gmom |
git merge origin/master |
gst |
git status |
gwip |
git add -A; git rm $(git ls-files --deleted) 2> /dev/null; git commit --no-verify --no-gpg-sign -m "--wip-- [skip ci] |
gunwip |
git log -n 1 | grep -q -c "--wip--" && git reset HEAD~1 |
I didn't write these aliases; they come from oh-my-zsh. If
you don't use zsh or don't want install all of oh-my-zsh, the source code for
the git aliases is
here.
You can copy and paste this into your ~/.bashrc if you use bash, or adapt
them to whatever terminal you use.
In particular, we are going to use the gwip and gunwip commands throughout
this guide to create various scenarios, so copy and paste this into your
unix-like shell now:
alias gunwip='git log -n 1 | grep -q -c "\-\-wip\-\-" && git reset HEAD~1'
alias gwip='git add -A; git rm $(git ls-files --deleted) 2> /dev/null; git commit --no-verify --no-gpg-sign --message "--wip-- [skip ci]"'
Clone the Companion Repo for Interactive Examples
There is a companion repo to
accompany this post. Clone it, then cd into it and pull all the remote
branches with git pull --all
Staging Hunks with git add -i, VSCode, or Vim
After cloning the companion
repo, checkout to the branch
origin/interactive_staging, and do a gunwip. git diff should then provide
the following output:
diff --git a/feature.txt b/feature.txt
index 30dbb2c..7f9611b 100644
--- a/feature.txt
+++ b/feature.txt
@@ -1,3 +1,5 @@
+New feature! Great stuff.
+
 This is pre-existing stuff.

-It existed before you started yur feature.
+It existed before you started your feature.
As you can see, we have two unrelated changes to feature.txt. First, we have
our new feature at the top, and later a change to a pre-existing spelling
mistake. Often, when we're working on a feature, we find things along the way
that we want to adjust: refactoring something janky, rewording a comment, or
even just fixing a spelling mistake. Ideally, we want to make these changes to
improve the code, but it is also natural to hesitate to touch any source code
outside the scope of the feature we're working on, since it'll make our commit
history sloppy. Every commit must be singularly focused, concise, and atomic,
but the minute-to-minute workflow in a codebase isn't necessarily like that.
We need to be able to create commits that comprise a subset of the changes in
our working tree, and that's exactly where interactive staging becomes useful.
Interactive Staging from the Command Line
git add --interactive (or git add -i) will send you into an interactive
REPL (read evaluate print loop) where you can stage and unstage chunks of code
one at a time. You can try it out locally now, and here's what you should see:
           staged     unstaged path
  1:    unchanged        +3/-1 feature.txt

*** Commands ***
  1: status       2: update       3: revert       4: add untracked
  5: patch        6: diff         7: quit         8: help
What now> 8
status        - show paths with changes
update        - add working tree state to the staged set of changes
revert        - revert staged set of changes back to the HEAD version
patch         - pick hunks and update selectively
diff          - view diff between HEAD and index
add untracked - add contents of untracked files to the staged set of changes
Git prints out the list of modified files (just one in this case). The command we're most interested in is the "patch" command, which is where we can go through the changes in a single file and granularly stage changes one chunk at a time.
After pressing p for patch, git will ask you to choose your file, enter 1,
since there's only one choice, and git will cycle through changes one by one,
prompting you for what to do. Here's what I see on our feature.txt file:
diff --git a/feature.txt b/feature.txt
index 30dbb2c..7f9611b 100644
--- a/feature.txt
+++ b/feature.txt
@@ -1,3 +1,5 @@
+New feature! Great stuff.
+
 This is pre-existing stuff.

-It existed before you started yur feature.
+It existed before you started your feature.
(1/1) Stage this hunk [y,n,q,a,d,s,e,?]? ?
y - stage this hunk
n - do not stage this hunk
q - quit; do not stage this hunk or any of the remaining ones
a - stage this hunk and all later hunks in the file
d - do not stage this hunk or any of the later hunks in the file
s - split the current hunk into smaller hunks
e - manually edit the current hunk
? - print help
Uh oh, git is viewing both of my changes as the same hunk! No worries, I can
use the s command:
(1/1) Stage this hunk [y,n,q,a,d,s,e,?]? s
Split into 2 hunks.
@@ -1,2 +1,4 @@
+New feature! Great stuff.
+
 This is pre-existing stuff.

(1/2) Stage this hunk [y,n,q,a,d,j,J,g,/,e,?]?
Much better! Now it's just showing me that first chunk of changes.
Go ahead and experiment. When you are satisfied with the subset of changes you have, exit the tool and make a commit as usual. Your goal is to end up with two separate commits that isolate the feature from the spelling fix.
The correct answer is demonstrated on the origin/interactive_staging_answer
branch.
Interactive Staging with the VSCode
First, run git reset --hard origin/interactive_staging to restore the state
of your local branch to the remote branch, then gunwip again. This should
bring your local environment back to the state at the beginning of the last
example.
You can also interactively add changes inside VSCode.
 Interactive staging in VS Code
Interactive Staging with Vim
In my opinion, nothing gets better than vim and git
fugitive. You can use :Gdiff to open
a diff view for a file. You can use dp (diff put) to push changes from the
side your cursor is currently on to the opposite side, or dg (diff get) to
pull changes from the opposing side of the diff into your side. You can also
directly edit either side of the diff. This offers very granular control over
exactly what is staged versus unstaged.
 Interactive staging in Vim
Cherry-Picking
git cherry-pick is simple but sometimes super useful. Let's say you build
some super handy developer tooling features for your team. It would really help
for a feature you're developing, but it's currently trapped in code-review
purgatory. The feature exists on a different branch, but you want it on your
dev branch for this feature so that you can use it right now!
It turns out, you can snatch a commit by it's SHA-1 hash from any branch with git cherry-pick.
For this demo, start by checking out to the cherry_pick branch; it's the same
as the main branch.
git checkout origin/cherry_pick
Now, we have a branch origin/cool_new_features. It has three new features on
it. Here's another trick: did you know you can pass a branch name to git log,
so we can inspect what is on origin/cool_new_feature without needing to
actually checkout again. Just run git log origin/cool_new_feature, and you
should see the following output.
commit 81e142ae6eb5d85854af48f639a7fd3c368a7755 (origin/cool_new_features, cool_new_features)
Author: Jack DeVries <[email protected]>
Date:   Sun Oct 16 17:42:09 2022 -0400

    feature three

commit fdd0fbb5ce7190f3cb7d2c33ae9dbc3137a923e4
Author: Jack DeVries <[email protected]>
Date:   Sun Oct 16 17:41:58 2022 -0400

    feature two

commit aa7d855ad3bdb56b8400318e1fed9da88d3bfe13
Author: Jack DeVries <[email protected]>
Date:   Sun Oct 16 17:41:46 2022 -0400

    feature one

commit 27c637c175fe617aca38f6df62e895742861857b (HEAD -> cherry_pick, origin/main, main)
Author: Jack DeVries <[email protected]>
Date:   Sun Oct 16 16:22:39 2022 -0400

    initial commit & readme
From here, we can very easily yank "feature two" onto our dev branch
("cherry_pick") as follows:
git cherry-pick fdd0fbb5ce7190f3cb7d2c33ae9dbc3137a923e4
After running this command, do a git log to see that "feature two," and none
of the other features from origin/cool_new_features, are now on your dev
branch. You should see the following history:
commit e24d759232f286de07247a0d54b4260e231f03c0 (HEAD -> cherry_pick)
Author: Jack DeVries <[email protected]>
Date:   Sun Oct 16 17:41:58 2022 -0400

    feature two

 feat_two.txt | 1 +
 1 file changed, 1 insertion(+)

commit 27c637c175fe617aca38f6df62e895742861857b (origin/main, main)
Author: Jack DeVries <[email protected]>
Date:   Sun Oct 16 16:22:39 2022 -0400

    initial commit & readme

 README.md | 4 ++++
 1 file changed, 4 insertions(+)
Understanding Merge Commits
Let's dive deep into the wonky and wonderful world of merge commits. Every time
you merge two branches, the merge commit of those two branches is exactly the
same. Git has no understanding of which of the two is "main" or "master"; it
only combines them. We can demonstrate this by creating two branches, A, and
B. If we create different commits on each, then merge A into B and B
into A, we'll notice that the git hash at the tip of the branches becomes the
same; the branches are, at that moment, exactly equivalent.
This is demonstrated on the example repo with the branches merge_a, and
merge_b. Try it out to see for yourself:
$ echo "A: $(git rev-parse origin/merge_a)"
A: bf48661afb198965704cd30ae205add341d3ede8
$ echo "B: $(git rev-parse origin/merge_b)"
B: bf48661afb198965704cd30ae205add341d3ede8
To dig in a bit deeper, I created a bunch of "dev branches" off of main on
our repo, and merged them each back in with a few unique changes. As you can
see, I intentionally made the lifecycles of these dev branches criss-cross so
that we can see many scenarios.
Here's a quick overview of all the dev branches that exist:
$ git branch --remote | grep dev
origin/dev_branch
origin/dev_branch_two
origin/dev_branch_three
origin/dev_branch_four
origin/dev_branch_five
The only file changed throughout all this is example.txt. Here's what it
looks like at the end:
change one
change two
change three
change on branch two number one
change on branch two number two
change on branch two number three
change four
change five
change six
dev branch 3 #1
dev branch 3 #2
dev branch 3 #3
misc commit x
misc commit y
misc commit z
dev branch 4 #1
dev branch 4 #2
dev branch 4 #3
dev branch 5 #1
dev branch 5 #2
dev branch 5 #3
Now, each line in the file above belongs to a commit in the history below. Line content and commit message always matches, except for the initial commit and merge commits throughout.

Result of git log --oneline --decorate --graph
What's amazing if you hadn't realized this before is that git keeps track of
these many concurrent versions of history forever. Although git log makes it
look like history is linear, it really isn't. If you checkout to a commit on
one of these branches, the state of the source tree is exactly as it was when
you were working on that commit on the dev branch. For example, look at
dev_branch_five. I intentionally branched off an early commit in the history,
and didn't land it back on main until the very end. As such, you can see the
green line snaking through the whole history. Focus on 7b7f59a, it's the
second commit from the top. If you were looking at git log, which squashes
this history into a linear progression, you'd probably think that 7b7f59a
contains all the stuff that apparently precedes it. Actually, if you checkout
to this commit, you'll see that it only contains the commits on that green
line! In other words, only the commits from dev_branch_five itself, as well
as the original dev_branch. A bash snippet is worth a thousand words, it
seems; give it a try:
$ git checkout 7b7f59a \
      && cat example.txt \
      && git checkout -
change one
change two
change three
dev branch 5 #1
dev branch 5 #2
dev branch 5 #3
Reverting Commits
With all that newfound knowledge, we can start to understand what is going on when we try to revert one of these merge commits, and get the following message:
$ git revert 4608cadcaa71390123e23cb1614ad4d1c4928aaf
error: commit 4608cadcaa71390123e23cb1614ad4d1c4928aaf is a merge but no -m
option was given.
fatal: revert failed
Spooky, but no worries, let's see what the man page says for the -m option of
git revert!
-m parent-number, --mainline parent-number

    Usually you cannot revert a merge because you do not know which side of the
    merge should be considered the mainline. This option specifies the parent
    number (starting from 1) of the mainline and allows revert to reverse the
    change relative to the specified parent.

    Reverting a merge commit declares that you will never want the tree changes
    brought in by the merge. As a result, later merges will only bring in tree
    changes introduced by commits that are not ancestors of the previously
    reverted merge. This may or may not be what you want.

    See the revert-a-faulty-merge How-To[1] for more details.
Yeah, totally self explanatory! Anyway, to quote myself from a few paragraphs ago:
Every time you merge two branches, the merge commit of those two branches is exactly the same. Git has no understanding of which of the two is "main" or "master"; it only combines them.
As we saw, after merge_a and merge_b were merged into each other, they had
the same exact git hash. Every merge commit, therefore, represents a "fork in
the road" if we're trying to travel backwards through history; and git doesn't
have any affinity for one path over the other. Except, the fork in the road
analogy has a caveat: the road does generally come back together again a few
commits later.
Let's focus on this piece of history on main:
* 2b4f4f4 Merge branch 'dev_branch'
|\
| * c5b380a change three
| * 237db4d change two
| * 236e6ec change one
|/
* 27c637c (merge_two.txt, merge_two) initial commit & readme
Reverting 2b4f4f4 implies that either the code on the left side will be
reverted (purple), or the code on the right (string of stars). Obviously, if
we're trying to undo everything that happened in that dev branch, we want to
throw away the branch on the right side and keep what's on the left, discarding
the commits created on the dev branch. Git, however, cannot help us. We need to
help ourselves. We can help ourselves with the -m flag.
Count the possible branches from left to right. In this case, we have only two
options. If we revert with -m 1, git keeps the first path, discarding all
others. This is what we want. If, however, we say -m 2, nothing will actually
happen! That's because there are no commits on the left side of history. Try it
out!
# when we try to discard the history on the left side, git tells us there is
# nothing to do
$ git revert -m 2 2b4f4f4
On branch main
Your branch is up to date with 'origin/main'.

nothing to commit, working tree clean
If there were an intermediary commit on the left side, though, passing -m 2
would keep the history on the right and remove what's on the left; removing
commits that might be completely unrelated to what we're trying to revert!
Looking back at the full history, there is an example like that: reverting the
merge commit for dev_branch_five. Experiment, and see what happens when you
keep the history on the left, versus the history on the right! Obviously, the
two histories are quite different, so experimentation here should give you a
feel for what is happening. If you choose -m 1, you will revert
dev_branch_five as we understand it. If, on the other hand, you pass -m 2,
you'll tell git to use the full history of dev_branch_five and abandon what
we know as a bunch of work on main! (I
didn't get time to test it, let's experiment and confirm whether this is the
case!)
Keep in mind that if you're consistently merging into main, and every
non-main branch only branches away once and branches back once, reverting merge
commits should be simple. If, however, you're using git flow, where you have
many possible target branches, and maybe also long-lived dev branches, the
history graph as visualized earlier can start grow towards the right side of
your screen, and there can be many possible paths for reverting merge commits.
Interactive Rebasing
Re-basing is a way to permanently change git history, and to combine branches in a way that creates simple linear history rather than branching history as we saw in the section about merge commits.
Comparing Combining Branches via Rebasing vs. Merging
Re-basing, in some sense, is the opposite of merging in git. As we just learned, git does some truly elegant stuff to maintain and combine multiple parallel versions of history. Re-basing treats history carelessly, allowing you to make changes that prevent this parallelized history from ever existing. When you re-base one branch onto another, you end up with a linear history that looks pretty "clean," at the cost of losing some information about the versions of software that truly used to exist.
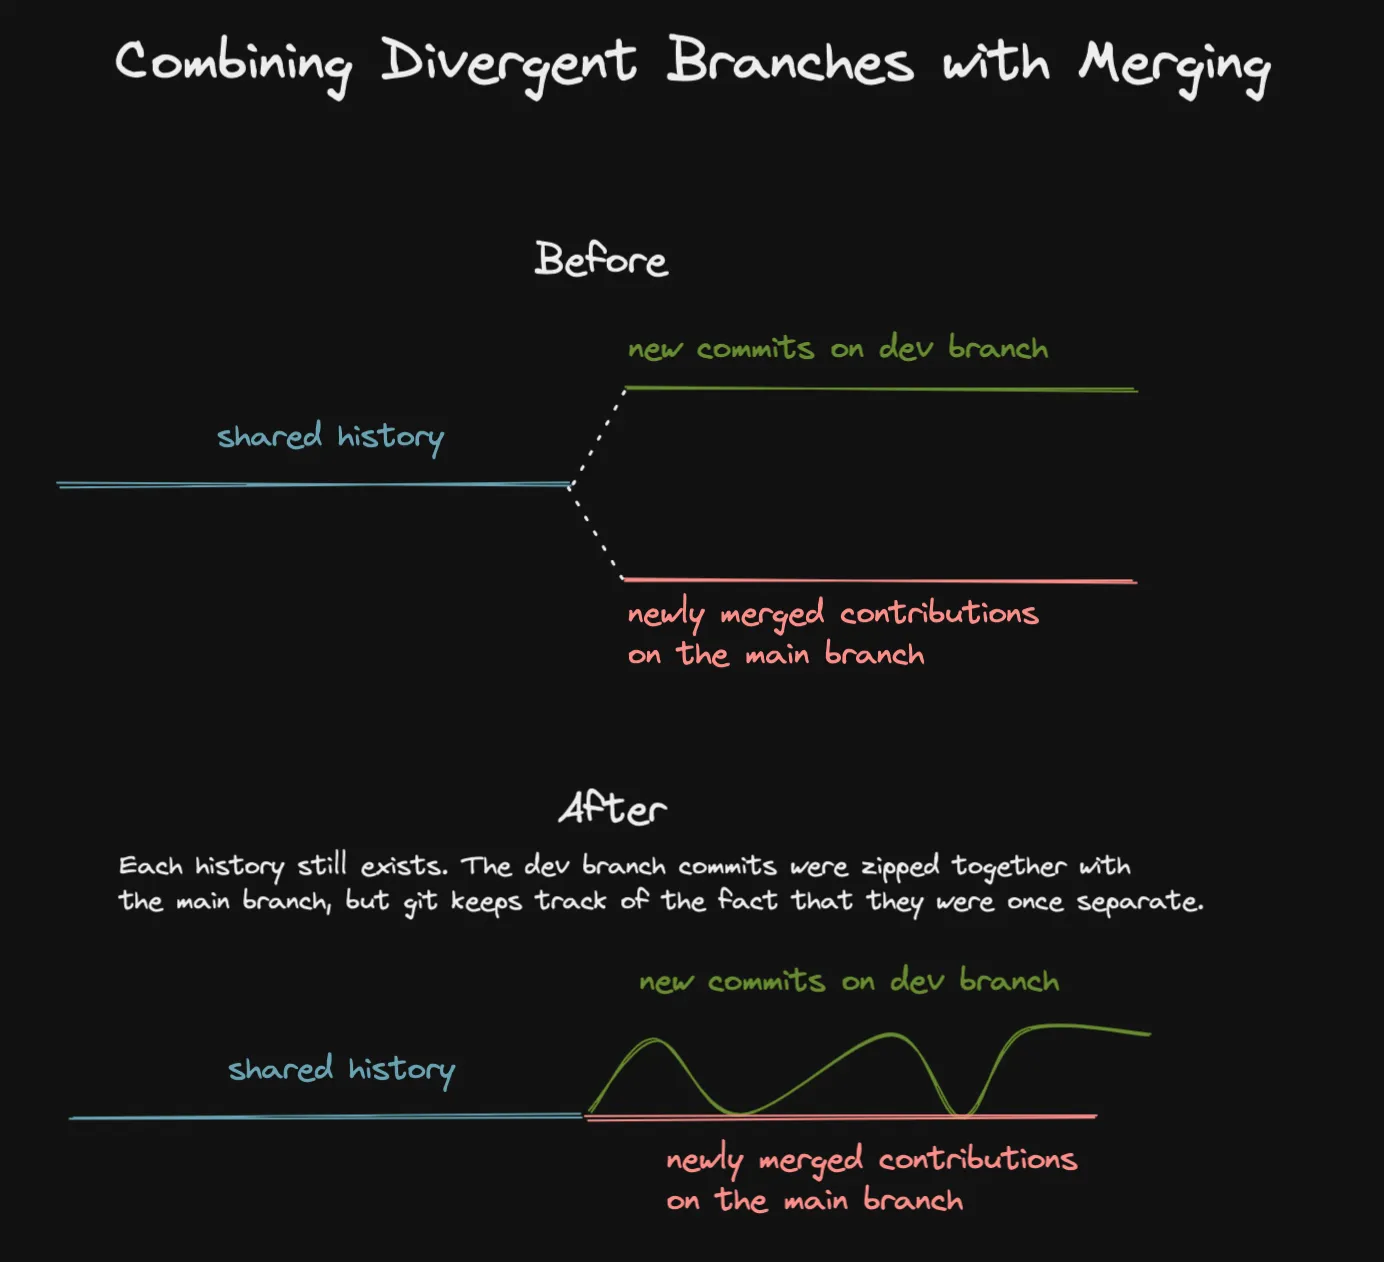 Visualization of combining branches with git merge
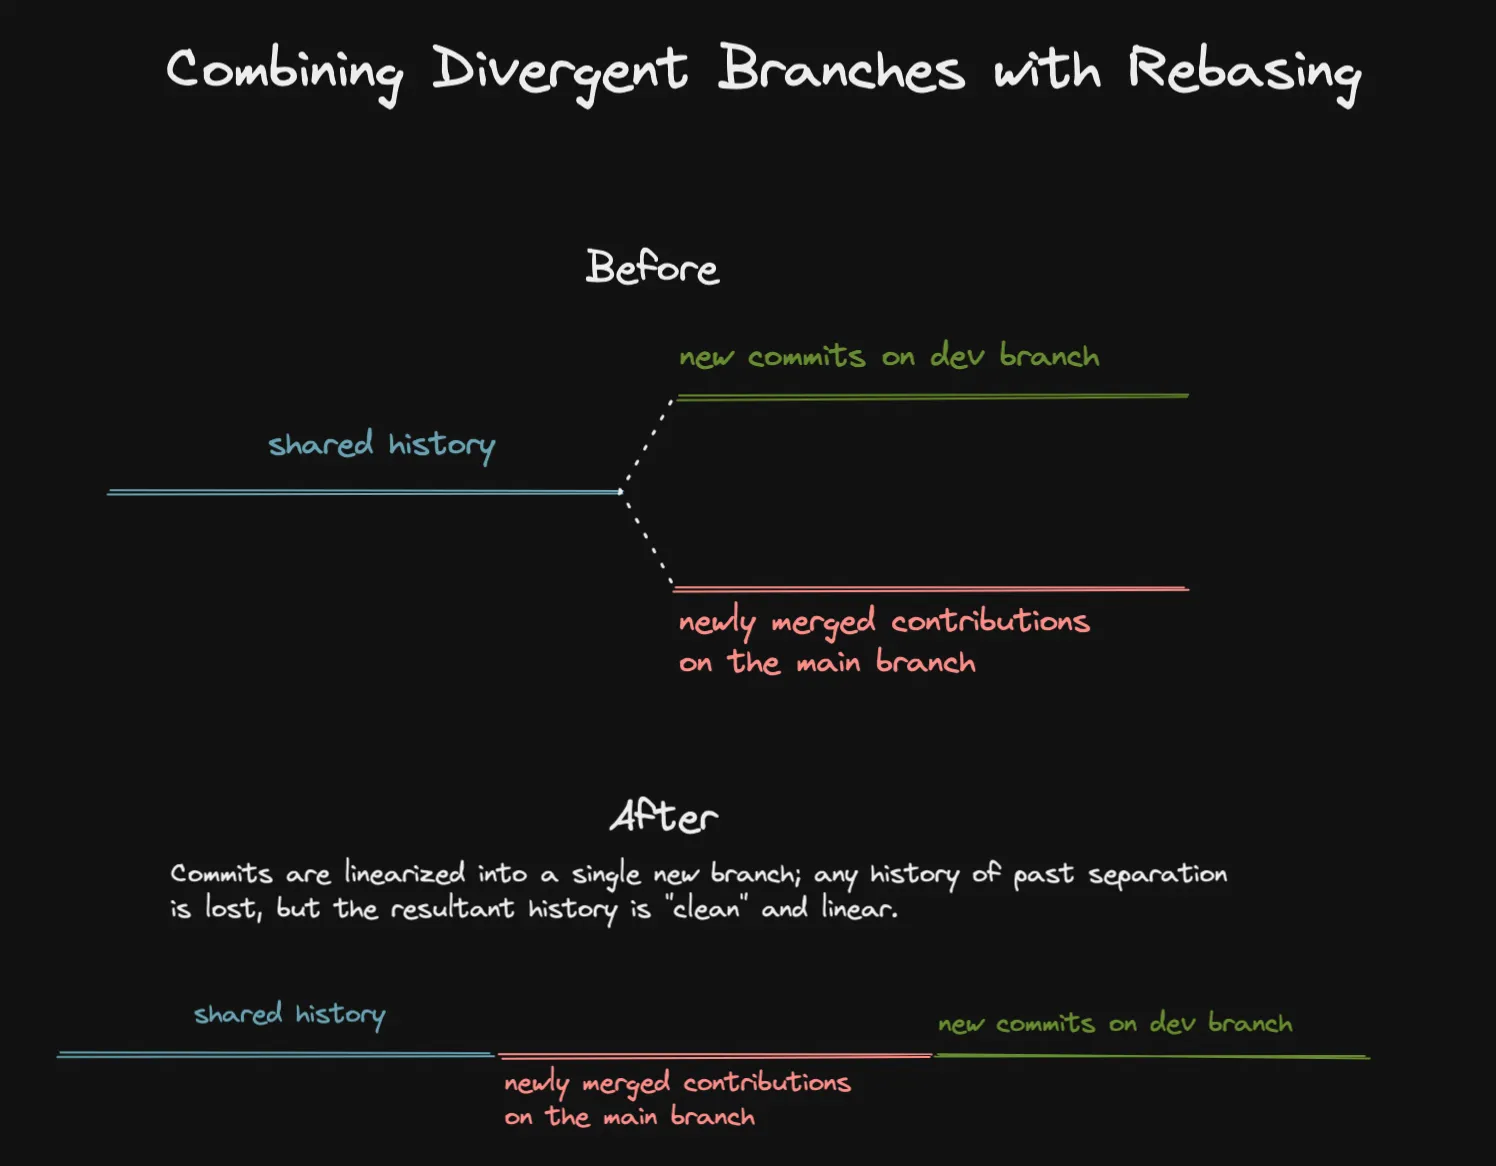 Visualization of combining branches with git rebase
Despite this haphazard treatment of history, I do prefer to use re-basing to keep my development branches in sync with the main branch while I am developing on that branch. The reason is that when you finish your feature and are ready to make a pull request, you might find that you want to make some changes to your commit history for that feature. Having your feature commits at the tip of your development branch makes it easier to revise history through interactive re-basing.
What is Interactive Rebasing?
Now, let's finally get to the point here: what is interactive rebasing? Interactive re-basing is a tool that exists on top of re-basing to make it easy for you to permanently change git history in any way. This can clearly be quite destructive, but it can also be useful for a few compelling use cases.
- You have a bunch of small incremental commits that helped your development process, but make you look like kind of an insane person. You want to squash them down into a single commit, or a series of commits that tell a nicer story for your reviewer.
- You notice a typo in a commit message, or realize that a commit message doesn't adhere to the standards set by your team.
- You need to drop commits from the history of your dev branch. For example, maybe you were developing against an experimental dependent feature which is being reviewed separately, and you want to pull those changes out of your dev branch so that code review can get started while the experimental feature also is being reviewed separately.
- You want to take a series of not-dependent commits and fan them out into multiple dev branches so that you can open multiple smaller PRs instead of a single gigantic one, to better support your reviewer
- You had a bug in an early commit on a feature which persisted through the following commits. You want to go back to the commit where the bug was introduced and patch it there, so that the reviewer doesn't have to see the bug and then later see the revision if they are reviewing commit-by-commit
Most of these things are great practices to keep your code reviewer happy and make your reviews move faster, but you're going to need to change git history to do any of them. You should also note that making changes to git history during the code review process can sometimes be problematic. GitHub and GitLab might get confused when you force push over an open MR. In my experience, GitLab tries pretty hard to be resilient against these types of changes, while GitHub is much more prone to conniptions. Either way, beware of the consequences of changing history after the MR or PR has been created. Generally, it's best to pause and get history as tidy as you want before starting the code review process.
How to Interactively Rebase
Going back to the companion repo, you can checkout to the branch
origin/interactive_rebasing.
git checkout origin/interactive_rebasing
Once you're there, you can see that this branch has three dummy commits on the tip of its history named appropriately:
commit 0dacf82d276bebc23b6f68cc5c088715ae58e383 (HEAD -> interactive_rebasing, origin/interactive_rebasing)
Author: Jack DeVries <[email protected]>
Date:   Sat Nov 26 21:11:10 2022 -0500

    interactive rebase commit 3

 example.txt | 1 +
 1 file changed, 1 insertion(+)

commit 1c0a76e93f416eab3e24c64d93f532d2ce21e010
Author: Jack DeVries <[email protected]>
Date:   Sat Nov 26 21:11:02 2022 -0500

    interactive rebase commit 2

 example.txt | 1 +
 1 file changed, 1 insertion(+)

commit abb6a01318431d5c41f5986e31ec51fcaf772a9d
Author: Jack DeVries <[email protected]>
Date:   Sat Nov 26 21:10:54 2022 -0500

    interactive rebase commit 1

 example.txt | 1 +
 1 file changed, 1 insertion(+)

commit 4608cadcaa71390123e23cb1614ad4d1c4928aaf (origin/main, origin/HEAD, main)
Merge: 2fddb59 7b7f59a
Author: Jack DeVries <[email protected]>
Date:   Tue Oct 18 21:30:14 2022 -0400

    Merge branch 'dev_branch_five'
I included the last commit so you can see where this branch diverged from
main, which will come up later in this section.
Now, a common way to interactively re-base is to "rebase the last 3 commits." To express this using the git CLI, we would use the following command:
git rebase -i HEAD~3
HEAD is the commit at the tip of the current branch
(0dacf82d276bebc23b6f68cc5c088715ae58e383 in this case). The tilde and the
number is an expression that means "three commits before" whatever it proceeds.
So, HEAD~3 is "3 commits before HEAD, which resolves to
4608cadcaa71390123e23cb1614ad4d1c4928aaf. If you're not convinced, you can
use the rev-parse command (revision parse) to print out how git resolves the
whole expression.
$ git rev-parse HEAD~3
4608cadcaa71390123e23cb1614ad4d1c4928aaf
Now that we have a target commit we want to re-base against, and the whole
command we want to run (git rebase -i HEAD~3), we can run that command and
you'll see this pop up in your editor:
pick abb6a01 interactive rebase commit 1
pick 1c0a76e interactive rebase commit 2
pick 0dacf82 interactive rebase commit 3

# Rebase 4608cad..0dacf82 onto 4608cad (3 commands)
#
# Commands:
# p, pick <commit> = use commit
# r, reword <commit> = use commit, but edit the commit message
# e, edit <commit> = use commit, but stop for amending
# s, squash <commit> = use commit, but meld into previous commit
# f, fixup [-C | -c] <commit> = like "squash" but keep only the previous
#                    commit's log message, unless -C is used, in which case
#                    keep only this commit's message; -c is same as -C but
#                    opens the editor
# x, exec <command> = run command (the rest of the line) using shell
# b, break = stop here (continue rebase later with 'git rebase --continue')
# d, drop <commit> = remove commit
# l, label <label> = label current HEAD with a name
# t, reset <label> = reset HEAD to a label
# m, merge [-C <commit> | -c <commit>] <label> [# <oneline>]
#         create a merge commit using the original merge commit's
#         message (or the oneline, if no original merge commit was
#         specified); use -c <commit> to reword the commit message
# u, update-ref <ref> = track a placeholder for the <ref> to be updated
#                       to this position in the new commits. The <ref> is
#                       updated at the end of the rebase
#
# These lines can be re-ordered; they are executed from top to bottom.
#
# If you remove a line here THAT COMMIT WILL BE LOST.
#
# However, if you remove everything, the rebase will be aborted.
#
And there you go, just edit the three lines of text at the top according to the
directions at the bottom, and git will guide you through reorganizing history
in whatever way you wish. After you save and exit the file, git will execute
the procedure you've created through your text changes from the top to the
bottom. Certain commands like edit will cause the re-basing process to stop
at an old commit, where you can change the code and amend to the historical
commit as you wish. If you are confused at any
point in the process, just run git status, and git will give you some handy
information about what is going on and what you need to do next, which will
usually be some variation of:
- Git is ready to proceed, you can run
git rebase --continue - There is a merge conflict you need to resolve
- We are stopped for editing. You can make the edit, or if you run
git rebase --continuewithout making an edit, that'll cause no edit to occur.
You can also run git rebase --abort at any point in the process if things
start to go sideways, and it'll be like nothing ever happened!
Experiment with the companion repo, and change history as you wish! Change commit messages, reorder commits, make edits and amends to old commits, and squash commits together until you have a feel for the process. Each of the 3 commits for you to practice on have changes that are close together, so merge conflicts will often occur during the re-basing process if you change an old commit or reorder commits; this is great practice too!
Reflog
The ref log is a simple but hugely useful command, especially if someone has been monkeying with git history! In fact, if you've made a mistake and deleted a bunch of work through a bad re-base, I can guarantee you that this command will save you more time than anything else I've shared so far!
Conceptually, it's easy to understand what the ref log is. Here's the git reflog output from my instance of the companion repo after writing the
previous section about re-basing:
0dacf82 (HEAD -> interactive_rebasing, origin/interactive_rebasing) HEAD@{0}: rebase (finish): returning to refs/heads/interactive_rebasing
0dacf82 (HEAD -> interactive_rebasing, origin/interactive_rebasing) HEAD@{1}: rebase (start): checkout HEAD~3
0dacf82 (HEAD -> interactive_rebasing, origin/interactive_rebasing) HEAD@{2}: commit: interactive rebase commit 3
1c0a76e HEAD@{3}: commit: interactive rebase commit 2
abb6a01 HEAD@{4}: commit: interactive rebase commit 1
4608cad (origin/main, origin/HEAD, main) HEAD@{5}: checkout: moving from main to interactive_rebasing
4608cad (origin/main, origin/HEAD, main) HEAD@{6}: clone: from github.com:jdevries3133/git_some_help.git
As you can see, it's literally a log of all the commits that your local HEAD
has pointed to while you're working. If you do a big re-base, every single step
of the process, even ones that git whizzes past will be pushed into this log.
Every time you checkout between branches, it's logged. Try running this command
anywhere in the companion repo.
# warning: this command is destructive!
git reset --hard HEAD~1
That command will delete the most recent commit from the branch you are working on. The work is (apparently) gone forever! If you've ever done this by mistake and not known how to get your work back, you will forever remember the feeling of dread.
I ran this command in the companion repo, but here is what the ref log looks like after running it:
1c0a76e (HEAD -> interactive_rebasing) HEAD@{0}: reset: moving to HEAD~1
0dacf82 (origin/interactive_rebasing) HEAD@{1}: rebase (finish): returning to refs/heads/interactive_rebasing
So, 1c0a76e is the commit I am checked out to after the reset; the version
of history where my latest work does not exist, but 0dacf82, the second item
in the ref log, still has the commit I thought I just deleted forever! Best of
all, I can go right back to that commit using a simple git checkout:
# you can use the commit hash fragment from the reflog
git checkout 0dacf82

# you can also use this expression, which is basically an index into the
# ref log. You see these throughout the ref log output
git checkout HEAD@{1}
As simple as that, our changes that were apparently lost forever are back on our local machine. To fully restore the working branch that we messed up, we just need to delete it, then checkout to a branch of the same name from our current position. Remember, we're currently just checked out onto a random free-floating commit that is not on any branch, so we want to fix that situation.
# this is safe because we're currently checked out to the version of this
# branch that we _do_ want
git branch -D branch_we_messed_up

# create a "new" branch of the same name, repairing our local git repo
git checkout -b branch_we_messed_up
Wrap-Up
Thanks for reading! Leave a comment if this was useful or if you have any feedback.