Created: 8/13/2022
Vim Meta
So, you already know the basics of editing text with vim. You know about motions and actions, and can jump around and edit a file like a keyboard wizard. Maybe you've been using a text editor plugin for VS Code or your IntelliJ IDE that emulates vim.
This is great! You might be satisfied with this level of vimmery, and if you are I'm happy for you. But, if you want to transitioning towards using real vim or neovim on the command line as an everyday tool, you're going to need to learn some more "meta" vim concepts:
- configuration
- buffers
- windows
- tabs
- terminal emulator
- file explorer
Each of these concepts support you in navigating codebases and doing getting development work done with vim, and go beyond the basic text editing shortcuts.
OK But What About LSP, Debugging, and the IDE Experience?
vim on its own doesn't provide language support features or in-editor debugging, but neovim has plugins that are excellent for these things. If you depend on these things, you can jump straight to neovim with these plugins setup, although it might be a bit of a steep learning curve. I'd recommend at least trying vim as a plain text editor for a week of two until you feel comfortable with the topics listed above. Remember that those fancy plugins are going to come with their own learning curve, and I think that you're fighting against yourself if you jump straight to the deep end with something like AstroVim or SpaceVim.
It is surprising how productive plain vim is without all those bells and whistles. Programmers were using vim as a professional tool in the 1990s, and it has 20 years worth of problem solving built into it. Working in vim is different than a graphical IDE, but it's surprising how effective those workflows can be. Plus, the neovim LSP tool was built by people who love vim, and those tools strive to evolve from vim's design philosophy. They often even integrate into vim's "old" features like the quickfixlist and jumplist.
This class stack overflow answer put it best; if you try to skip learning the "vim way," you might find that your problem with vim is that you don't grok vi!
Configuration
Configuration is a very deep topic but let's keep it simple: I have a basic
vim config on github which
represents a good place to start. If you simply look at the plugins.vim file
to see which plugins are
included,
you'll see that there are very few, and that is on purpose: keep trying to do
things the "vim" way, and use plugins when you're sure there isn't another way
to do what you're trying to do. Fork my config, follow the directions for how
to install it, and it'll have you up and running without much bloat.
If you want to make less of a commitment to my way of doing things, you can also use Tpope's vim-sensible plugin. Default vim configuration can be pretty weird, so I definitely recommend starting with some recommend config from an experienced vim or neovim user.
Another middle-ground option is to take a look at my
common.vim
module which is part of my vim and neovim configs. It goes further than
vim-sensible towards giving you useful keyboard mappings and other settings,
but it's a single file, which might be easier to reason with.
Configuring vim and neovim is a super deep topic, and one of the greatest joys of this text editor is the extent to which you can make it your own. To avoid getting too bogged down in this overview
Buffers
A buffer in vim represents an open file. By default, vim will close buffers
anytime you navigate away from a file, and warn you if it's unsaved, but if you
have set hidden in your config, then buffers persist in the background and
they can persist in an unsaved state. Aside from storing any unsaved changes,
buffers also keep track of the position of your cursor in the file, so that
you'll pick up right where you left off.
You can view all the buffers you have open with the :ls command. You'll see
that each buffer has a unique id, and you can go directly to any open buffer
with :b <id>. You can also type the name of the file, and vim will offer
completion options if you press tab; for example, :b my_text_file.txt. This
comes in handy if you have a terminal open in the background. In vim,
background terminals have the name of your shell, so the buffer name will often
be /bin/bash. So, you can consistently jump to a background terminal with :b bash<tab>. Similarly, in neovim, terminals start with term://..., so you can
jump to them with :b ter<tab>.
Sometimes, you might have unsaved changes in a hidden buffer, in which case vim will try to prevent you from quitting without saving, showing the following message:
E162: No write since last change for buffer "..."
If you want to quit anyway, you can use :q!. Or, if you want to write to all
buffers, including hidden ones, you can use :wa (:wall).
Vim will keep track of the last buffer you were editing, and you can toggle
back and forth between two buffers with C-^ (control + ^).
There are a lot of resources all about vim buffers online that go into more
detail, but never forget that vim's build-in help can be a great resource for
information. Just type :help buffers.
Windows
:split or :vsplit can be used to split your vim screen into two windows,
either horizontally or vertically, respectively. This is super useful because
you can look at two files side-by-side! I often find myself falling into a
4-panel layout if I'm really multitasking, which is way more files than I'm
comfortably able to look at in VS Code – that's the beauty of not having any
visible user interface!
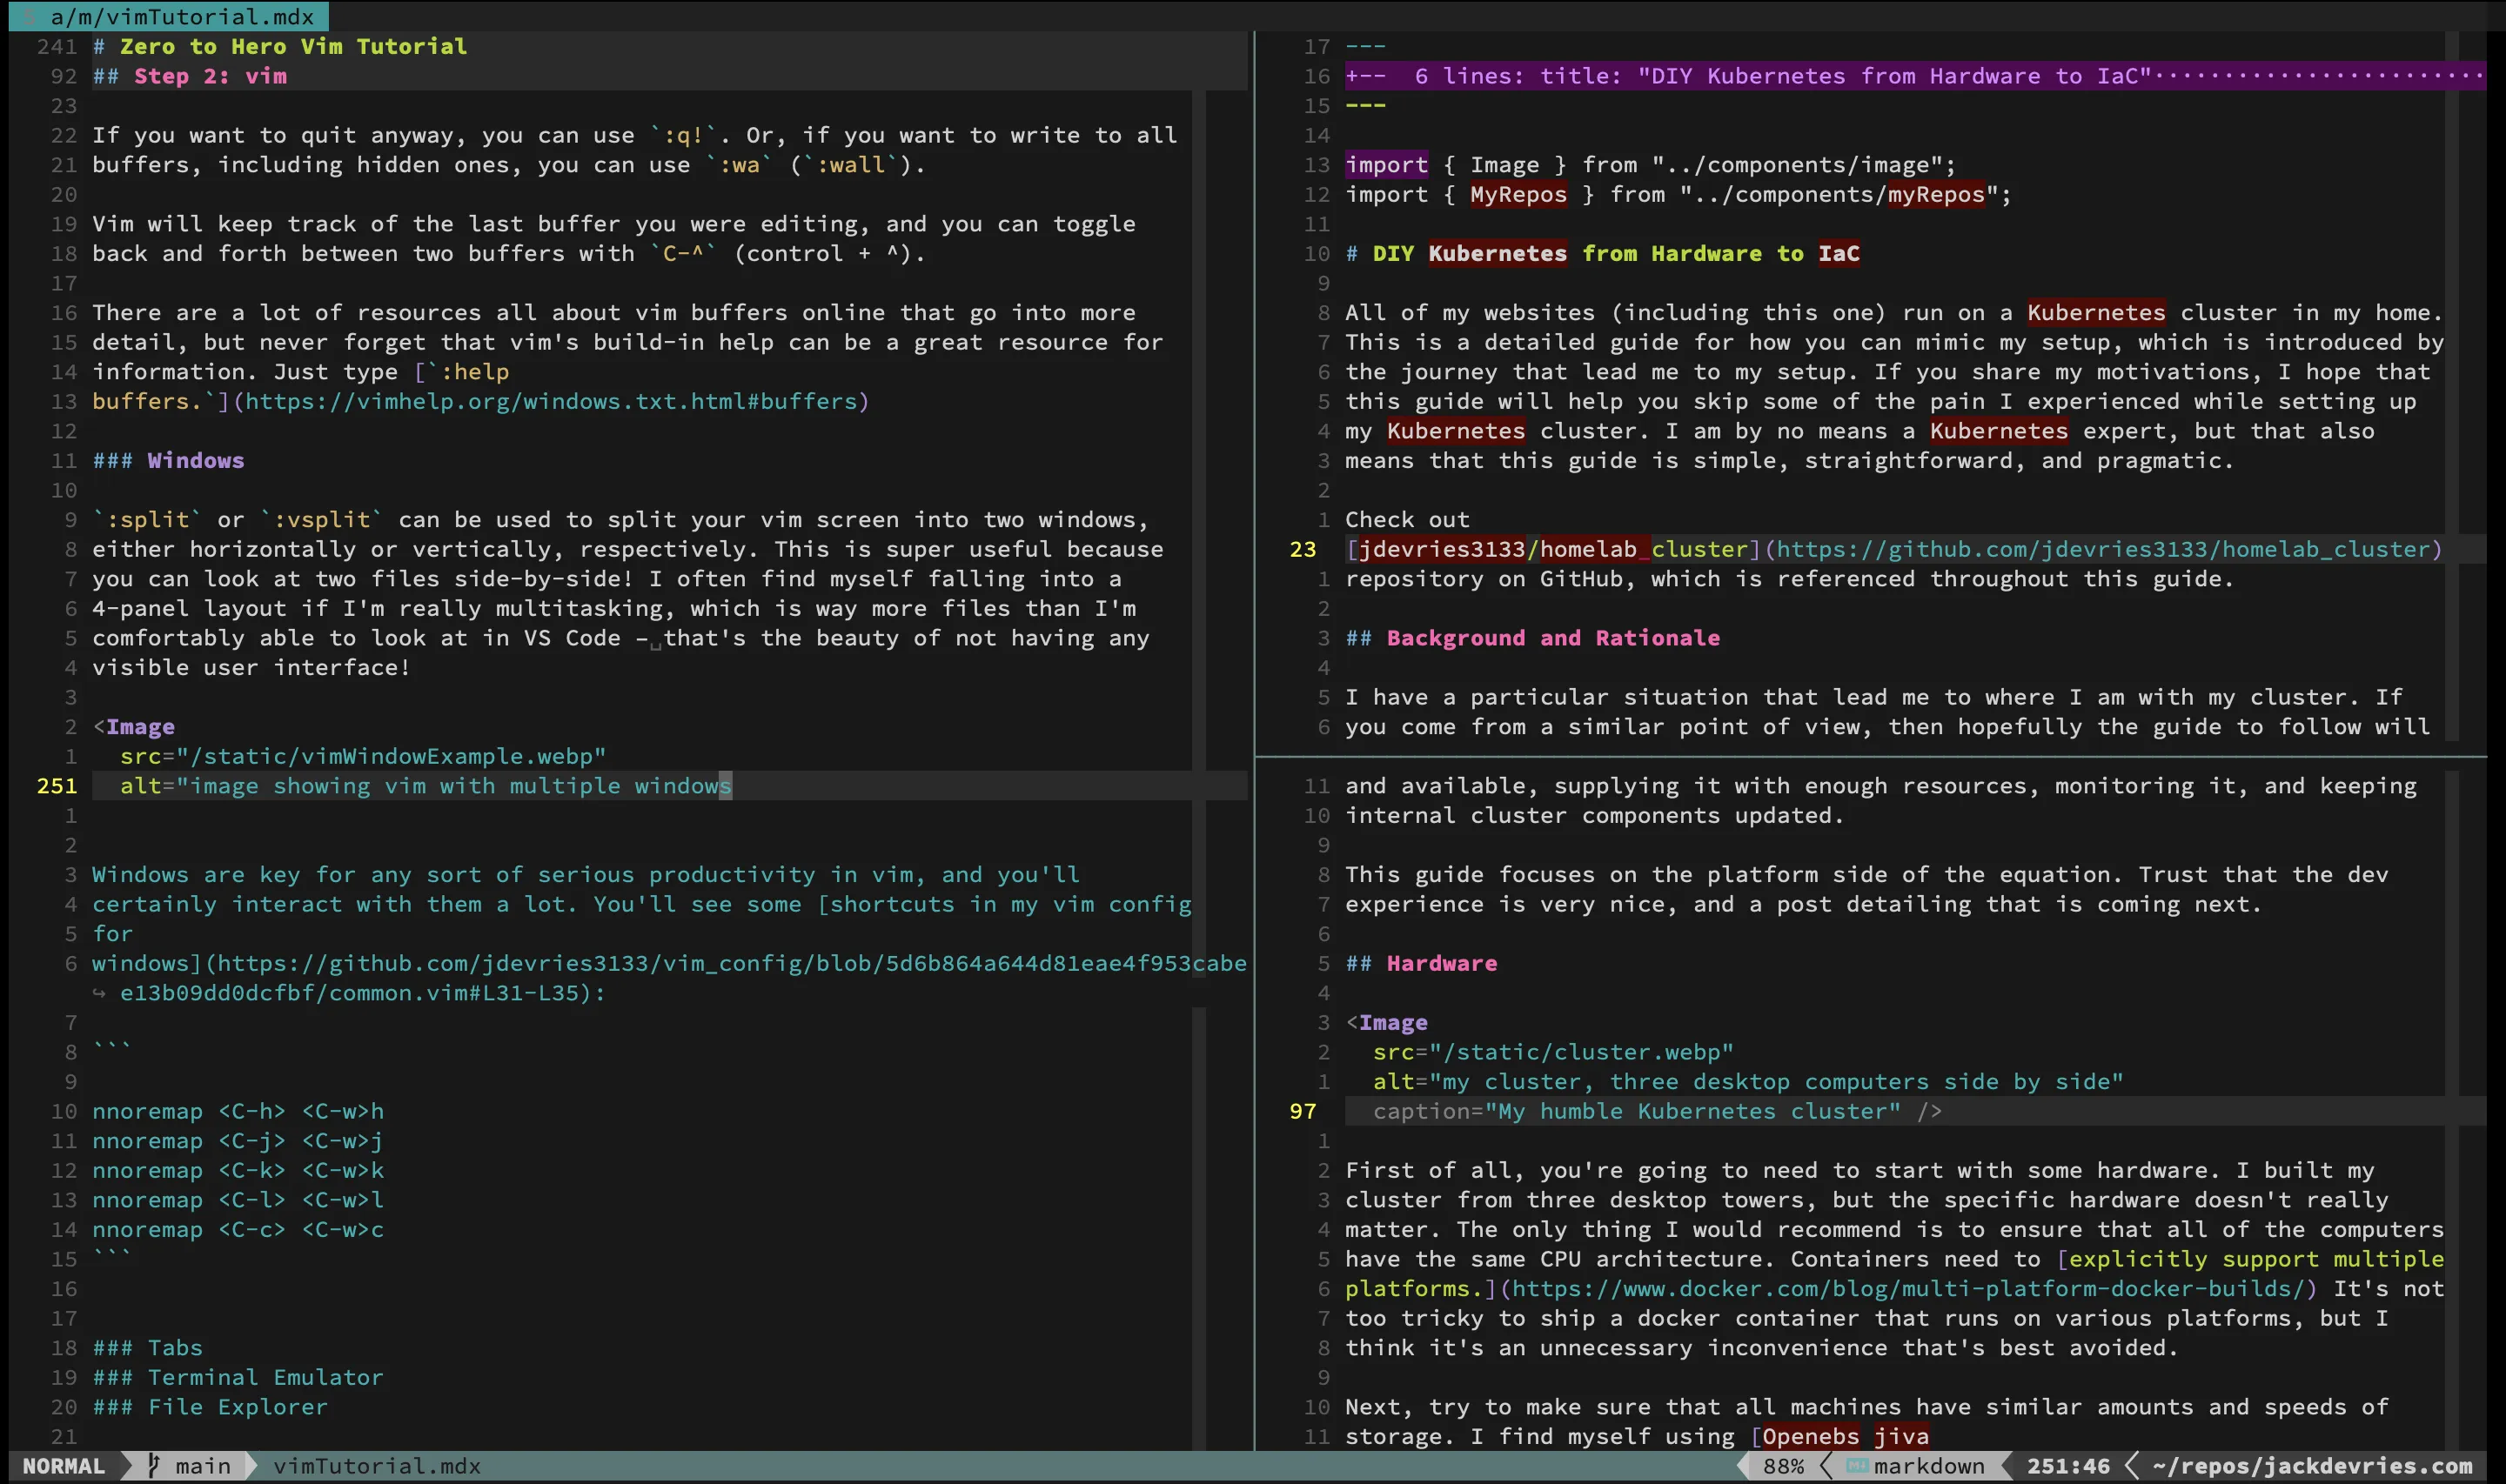 This is a real world example! I opened up 3 windows to figure out how to use this image component: this post's source is on the left, the import I needed to copy is on the top right, and the previous usage of this component is in the bottom right.
Windows are key for any productivity in vim, and you'll certainly interact with them a lot. You'll see some shortcuts in my vim config: to help with vim windows:
nnoremap <C-h> <C-w>h
nnoremap <C-j> <C-w>j
nnoremap <C-k> <C-w>k
nnoremap <C-l> <C-w>l
nnoremap <C-c> <C-w>c
Normally, to interact with windows, you have to type <C-w> ("control + w"),
then the "action" key. These are the default mappings:
<C-w>, thenhto move left<C-w>, thenjto move down<C-w>, thenkto move up<C-w>, thenlto move right<C-w>, thencto close the current window
These mappings make it so that you don't need to do so much typing to move between windows!
<C-h>: move left<C-j>: move down<C-k>: move up<C-l>: move right<C-c>: close the current window
Windows TL;DR
So, to simplify all of that, you can just hold down "control," and then use
those same fundamental vim movement keys (h, j, k, and l) to switch
between windows. Putting everything together, your typical vim-window workflow
looks like this:
- use
:vsor:spto split the current window - use
:e <file>, or:b <buffer>, or some other command to switch to a different file for one of those windows - hold
ctrland press "h," "j," "k," or "l," to move between the windows you have open; only works if you use the key mappings shown above!
Tabs
If you are used to VS Code or other popular IDEs, you probably use tabs a lot. We are used to tabs being the de-facto unit of organizing workspaces in most web browsers, text editors, IDEs, and other graphical applications. In vim, though, you can think about organizing your workspace hierarchically:
- buffers are the basic unit of organization, representing an open file and changes pending saving. These can exist in the background without any visible representation in the UI
- windows allow you to view more than one file at a time using splits
- tabs comprise a collection of windows
Tabs are good for separating streams of thought in your workspace. For example, if I'm hunting down a bug and I start to branch off into looking down different code paths, I might start opening up tabs to organize each of those threads of debugging. Also, I usually like to keep my terminal open in a separate tab, so that I have one full-size tab for my terminal, and another tab for the text I'm editing. Yes, modern version of vim and neovim have built-in terminal emulators!
See :h tabs for the nitty
gritty details, but tabs are pretty simple to interact with:
:tabnewto create a tab- the quickest way to close a tab is to close the last window in the tab, or
you can use
:tabclose gtto circulate through tabs, orgTto circulate backwards through tabs
I also have a handy shortcut in my vim config to open a tab by just pressing
"T" in normal mode:
nnoremap T :tabnew<cr>
Terminal Emulator
Make sure you're using Vim
v8or higher, or any version of neovim. Also, double check that your version of vim was compiled with the terminal emulator feature; see:h terminal
Vim and neovim have terminal emulators built into them, so you can create terminals and run commands within a special vim buffer without ever needing to leave the editor. Better yet, you can yank terminal output like regular vim text, and you can paste content from vim buffers into the vim terminal.
Overall, the terminal is pretty self-explanatory, but beware that the default
escape key from the terminal is not <Esc> like everywhere else in vim. This
is because certain terminals use the <Esc> key, so vim needs to pass that key
through to the underlying shell. Instead, the default sequence is <C-\> <C-n>. This looks ultra confusing, but it's basically just typing \n with
the ctrl key held down. I still find it clunky, and you already know that my
preferred escape sequence is jk, so I have the following mapping in my vim
config:
tnoremap jk <C-\><C-n>
File Explorer
A lot of people like to use fancy file explorers like nerdtree, nvim-tree.lua, or others. Vim and neovim actually have a built-in file explorer called netrw.
Netrw is definitely weird, but poking through a file explorer isn't the ideal way to navigate between files in vim, anyway. I still use it plenty, but with a few tweaks, netrw is a passable tool, and it's not your only choice for getting around a codebase.
This post does a better job going into detail, so I'll defer to them; see, "Vim: you don't need NERDtree or (maybe) netrw"
I do have a snippet from my config that makes netrw much more friendly:
" netrw is vim's built in file explorer, and has a huge banner consuming 2/3
" of the vertical screen space by default. This disables it.
let g:netrw_banner = 0

"   0: re-using the same window  (default)
"   1: horizontally splitting the window first
"   2: vertically   splitting the window first
"   3: open file in new tab
"   4: open in previous window (very IDE-like)
let g:netrw_browse_split = 0

" netrw list styles:
"   1: thin
"   2: long
"   3: wide
"   4: tree
let g:netrw_liststyle = 3
Wrap-Up
Hopefully these concepts give you a stronger foothold with vim. I remember that when I was learning, these were the less-fun items and less-expected things I encountered when I was learning. Vim is fun when you're in a file editing text in the best way possible, but navigating across a codebase is where things get tricky and not-obvious. Please leave a comment if you think about similar topics that snuck up on you during your learning journey!